Sunday, May 22, 2011

Stripes, graphics, vinyl - aka trying to make it look like a race car

File this project under the category of "more work than I ever anticipated"...

For whatever reason, I like white race cars.  Makes it real easy to see sponsor logos (why I care about that on my unsponsored car I have no idea...) and to see if you have any oil leaks or other maladies.  My car is white as you can tell from the pic.  I'm also a big fan of blue and red stripes on white cars.  Like the Racing Beat Miata and the Brumos Porsches.  So I figured I'd add some red and blue stripes and be semi patriotic for the next race - Memorial Day weekend at Laguna Seca.  Laguna Seca baby!  Like the Vegas for car guys.  This is what the Racing Beat Miata looks like.


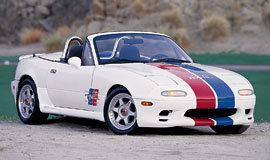
I wanted to do something similar to my car. 

"It's just some stickers.  Should take me 15 minutes to do this." is what I was thinking Saturday morning while hanging out at the pool with the wife.  So once I got bored sitting around, I went to TAP Plastics to see if they had any vinyl since they seem to have lots of other big boy toys.

I bought a few feet of blue and red vinyl sheet and came home thinking I'd install it on Sunday while the wife was working.  The local Bay Area Miata Driver's club had done a write up on installing vinyl stripes on a Miata. How hard could it be?  Yeah, right...

I managed to cut the stripes in the pattern I wanted without too much issue.  Then I tried to peel and stick.  That is when the annoying part started...  I got many many air bubbles when I tried to stick the stripes to the hood.  I pulled and re-attached the vinyl a few times and screwed up the vinyl a bit.  After spending more time popping the bubbles trying to make it look less amateurish, I gave up and stopped at the hood.  I was going to stripe the top and the trunk but I'm out of time.  Good enough for a home built Spec Miata.  :)

I also spent some time putting on the Toyo Tires stickers and AIM Tire stickers.  AIM had given me a great deal and great service on Team Dynamic wheels and Toyo RA1 tires shaved to 6/32" so I'll happily run their stickers on my car.  They also provide track side service so its good to support a local company.

Anyway, some before/after pics for your viewing pleasure.

Before:

After:

Check out my custom touches on the Toyo Tires sticker.  I cut each letter individually and placed it on the wheel well so it followed the contour.  Pretty cool I think. :)

Now I just need to get my Race Technology DL1 lap timer / data acquisition system working.  I bought it used and am still trying to figure it out....

Sunday, May 15, 2011

How to install an AMB Transponder in a Miata (1.6L)

So, my friend John D hasn't had any luck with transponder wiring and needed to rewire his so I figured I'd write up a post of how I installed mine.  Some people just hard wire it to the battery so the transponder always has power.  This is probably OK as the transponder does not draw much electricity but I'd prefer to have it wired to switched power so it only comes on when the key is on and the car is running.

So here it is.

I installed mine at the front of the car, under the driver side fender, in front of the wheel along the frame rail.  I like this location b/c there is a hole right there to feed the wiring through to one of the air bag wires that uses switched power. 

I used two self tapping sheet metal screws to mount the transponder to the car.  Seen here:
View from a lower angle:

The wiring winds up coming through under the driver side headlight.  Here is a pic of the wiring from the engine bay.  It is the curled up black wiring in case you it's not clear...

Here is a pic of the wire I used to get switched power. If you haven't modified the air bag wiring, it will probably have a blue connector plug on it.  I cut mine off and wired it directly.


There you have it.  Easy peazy and reliable.

John's former mechanic had wired it to the wiper motor so it only worked when the wipers were on.  He had one of the race prep shops fix it at the track when he found out it didn't work.  The 2nd shop charged him $125.  Later he discovered that they had wired it to his crank angle sensor when the attachment failed and caused the engine to cut out after 6000 RPM.  My way is better than either of these professional mechanics....

Hope someone finds that helpful.  Let me know if you need further detail on those pics.

Maintenance - what you do between races

Any aspiring racer has heard the old saying "In order to finish first, you must first finish".  Part of that is having a reliable car - which means maintenance.  You should arrive at the track ready to race - not with a list of things to do.  So, in preparation of the next race at Mazda Raceway Laguna Seca, I'm doing some preventative maintenance.

Differential Oil
My buddy Brandon (new owner of the Sharpie Spec Miata) stopped in to watch and help me change the oil in my diff.  It had 3 long race weekends on it along with some street driving to/from the track.  Some people recommend changing the diff oil after every weekend.  Some say to change it every 2 weekends.  Everybody seems to have an opinion on this but no one seems to have any data.  I tried searching/Googling for oil testing results but came up blank.  I've been using Blackstone Labs. for oil analysis on my RX7 and street cars for a while so I figured I'd get my diff oil tested.

I bought a quart of 75/90 Neo Synthetic Gear Oil locally at my favorite Mazda/Rotary shop - Rotorsport in Santa Clara and proceeded to change the oil. As usual, I made a mess of myself changing the diff oil and accidentally spilled the sample I took.  I hate diff and transmission oil.  It smells terribly!  Next time...

If any of you out there has any data on diff oil and oil change intervals for the Miata, Please share.

The engine oil (Redline 30 weight Race oil) only has one weekend on it and it looks good so I'm going to wait another race weekend before changing.

Brakes
At the last race weekend, my front brake pads had worn to the backing plates.  Thankfully, I had a spare set of Hawk DTC60 pads and replaced them at the track.  I thought the wear pattern on the front pads was a bit odd.  The driver side inner pad was worn more than any other pad.  I should have taken a pic but wound up throwing them in the trash.  I didn't have any grease for the caliper pins so I thought it would be a good idea to freshen the grease on the caliper pins.  It is important to the function of the brakes that the caliper pins are properly greased.

Here is a pic of the caliper pins that I am referring to.  It is partially removed in this pic.  There is one at the top of the caliper and another at the bottom.

This is what the caliper pin (its actually a bolt) looked like upon removal.  Not much grease on there eh?
I had bought some CRC Brake and Caliper Grease from the local auto parts store so that I'd have it in the future.  This stuff has moly and other good stuff that is supposed to be good for brake caliper grease.  I added this to my list of stuff to bring to the track so that I'll have it if I ever need it again.
I lubed it up liberally. :)

I re-installed the pins and torqued them to spec.  The top bolt torqued easily.  The bottom didn't seem to want to hit the limit so I gave up when it felt pretty damn tight. :)

I need to order another spare set of brake pads and also need a set of brake rotors.

Things to do while you are there - Inspect
Since I had the big spin at my last outing, I thought it would be a good idea to check that everything is still tight and do a "nut and bolt check" of the car while the wheels were off.  Actually, given the fact that I had my car, suspension, subframes, engine etc removed and re-installed during the build last year, it is a good idea for me to re-check the torque settings anyway....

What you basically do is get the torque ratings from the Factory Service Manual or other source and check that the bolts are tight to the correct torque setting.  If you don't have a torque wrench, get one.  I have a cheap one from Sears.  Randomly tightening bolts w/o knowing if they are already tight enough is a recipe for stripped bolts and expensive repairs.

Guess what?  Some of the bolts were loose.  The suspension bolts at the bottom of the shock and at the upper and lower A-arms were all tight.  So were the caliper to spindle bolts.  However, the nuts and bolts at the front subframe were not tight enough.  I rectified that situation and also re-torqued the engine mount bolts on the engine subframe.  Here is a pic of the nuts and bolts I am referring to.  The first photo is of the 2 19mm nuts behind the upper A-arm.  The second photo is of the 2 14mm bolts at the rear of the subframe.


It pays to be anal about stuff like this and check things regularly.  You don't want this to fail on track when you are driving all out.  The car is ready to go for Laguna Seca!